How to Go About Siding Installation

Stucco Charleston SC is an important part of your home, protecting it from moisture and other elements. It is also an attractive way to dress up your home’s exterior.

Before siding installation, it’s a good idea to trim branches and move any furniture that might be in the way. Some contractors will do this for you, but it’s also your responsibility to create room for the crew to work.

Before beginning your siding installation, the contractors will powerwash all exterior walls. This will remove any dirt and debris that might interfere with the new siding. They’ll also inspect the existing wall for water rot, sheathing damages, and asbestos. Before the project, the contractor will address these issues to ensure the new siding is securely attached and durable.

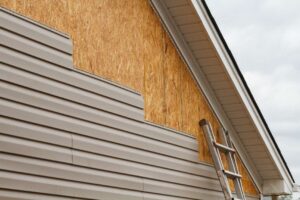
After the wall is cleaned and prepped, the construction crew will begin stripping the old siding down to your home’s frame. Then, they will install a base layer known as substrate, made of oriented-strand boarding (OSB) and similar to plywood. Next, a weather barrier will be stapled over the substrate to add another layer of protection from moisture for your home’s interior.

If you have bushes or trees near your house, trim them back to minimize the risk of them getting scraped during the process. It’s also a good idea to move any lawn decorations, furniture, or gardening equipment that might be in the path of the construction site. This will make the job more efficient and safer for the crew. The contractor will also remove and dispose of any old debris from the work area, so you won’t have to worry about it being left around your property or driveway.

In the meantime, it’s a good idea to park your vehicles farther away from your house to free up space for the dumpster and for workers to access your vehicle for materials. It’s also a good idea for families with children and pets to stay inside during the installation to avoid disturbing them by commotion.

Once the siding is installed, your contractor will reinstall any shutters and downspouts you removed during prep. They’ll also apply caulking around all edges of the new siding to secure it and help it resist moisture. They’ll use Sherwin Williams Duration caulking, which has a 50-year lifetime and will protect your siding from fading, chipping, or cracking over time.

When installing siding, it is important to have the right materials. The right materials will ensure a durable, long-lasting result. Different types of siding are available, from traditional wood-look products to engineered wood strand materials. Engineered wood strand technology allows these products to retain the look of real wood while being more resilient and long-lasting. These materials are often treated with zinc borate and other chemicals to protect against fungal decay, termites, and moisture.

The siding should be installed over a continuous water-resistive barrier to stop the intrusion of incidental rainfall. Check with your local building code to determine what type of barrier is required in your geographic area. Code-compliant flashing should be integrated with the water-resistive barrier and applied at the intersection of walls and roofing to prevent water infiltration (Fig. 26).

To help prevent water infiltration, it is best to install the trim and flashing before the siding is installed. This helps to give the siding a tighter fit around these areas and reduces the amount of caulk needed afterward.

Before installing the siding, the trim and flashing should be nailed with a trim nailer. The nails used should be finishing nails, not coil nails, as they are smaller and have a smooth head that is less likely to damage the siding. These nails can be purchased from most home improvement stores.

After the trim and flashing are in place, a type of flashing called Z-flashing should be installed above all doors and windows. This flashing is shaped like a long Z and is installed with one edge against the frame of the window or door and the other hanging slightly over the trim to redirect any water behind the rim.

Once the flashing and trim are in place, the substrate can be installed. A popular material for the substrate is oriented-strand boarding, or OSB, which is similar to plywood and provides extra stability for the vinyl siding. Some siding manufacturers also offer an insulated substrate product that can help increase your home’s energy efficiency.

If you are a DIYer or hiring a contractor, gathering materials and tools is one of the first steps. This includes a tape measure, pen/pencil and paper, a ladder, and possibly a rough sketch of the house. Once everything is ready, the siding installation begins. It is a good idea to start with the longest wall on the home’s exterior to get into a rhythm and ensure you are measuring correctly. All houses can be broken down into shapes of triangles and rectangles, which will help with the measurements. It would be best to determine where the soffit will be, as the new siding needs to meet with the house.

Once all the wall areas are measured, you can calculate how many squares of siding you will need for your project. For rectangular walls, you will need to take the area of each wall minus any windows and doors. For roofs, you will need to measure the base and height of each roof. You can also add the area of any garages, sheds, or other triangular structures on your property. It is a good idea to add 10% of the material in case of any waste or errors during the process. This will ensure you have enough materials during the siding installation.

The siding can be placed after the substrate (OSB, plywood, or similar product) is installed, and a weather barrier is stapled. Using a joint tape between the substrate and the weather barrier is important to prevent moisture from entering your home’s frame.

The last step of the siding installation is to nail the pieces together. Several methods can be used, but the most common is to use 3D-painted nails with colored heads that match the color of your siding. This allows for expansion and contraction while still allowing for a tight fit.

At this point, any other elements that need to be reinstalled, such as trim and window and door trim, can be reattached. This can also be a good time to reinstall any shutters. Once everything is in place, the yard will be cleaned, and any old materials removed during the siding installation will be released for recycling.

A proper maintenance plan is the best way to ensure that your siding lasts long. Developing one includes scheduling routine cleaning and inspections, identifying and making necessary repairs, and budgeting for major replacements or repair services. Regular inspections should consist of checking for signs of weather damage, including dents or cracks in the siding, loose boards, and water leaks. If you notice any problems, contact a professional siding contractor immediately to prevent further damage or mold growth.

It is also important to check that your gutters are blockage-free to prevent overflow and flooding of the sheathing, which can promote mold and mildew. It would be best to trim overhanging branches and foliage, as they can scratch or catch on the siding and cause damage. If your siding is exposed to a lot of rain, you should also consider re-nailing loose sheathing or replacing rotting components.

If you have steel siding, regularly inspect it after a storm to ensure that wind or flying debris doesn’t leave marks that could eventually rust. If you spot any scratches, apply a nonabrasive stainless steel scratch remover and scrub with a wire brush. If rust does appear, use a rust-inhibitive primer and paint the affected area (Miceli and Heil).

Once all the sheathing is installed, it’s a good idea to caulk or seal any gaps or seams in your siding to keep moisture out. This will not only prevent moisture penetration and promote a more energy-efficient home, but it will help to maintain the beauty and durability of your new siding.

Sealing any openings around pipes, vents, electrical outlets, and windows is also a good idea. This will help to improve your home’s energy efficiency, prevent moisture infiltration, and reduce air and sound pollution.

Concrete Driveway Repair Facts

Concrete Contractors Colorado Springs does considerable work to keep driveways in good condition. Stains, cracks, and holes are unsightly and indicate structural damage.

Wide cracks accompanied by sinking may require full slab replacement. Mudjacking is an alternative but it doesn’t address the root cause and is likely to fail.

concrete

If a concrete driveway has wide cracks or large holes, you want to hire a professional to repair these areas. A major crack that is more than a couple of inches wide is an indication of a structural problem that will likely require full slab replacement. Likewise, any crack that is accompanied by sinking or heaving in the rest of the driveway must be replaced.

If you only have a few hairline surface cracks, filling them with concrete caulk is a good short-term solution until the weather warms enough for more permanent repairs. To do this, chisel the crack to make it wider at the top than the bottom, then clean the area and brush on a latex bonding adhesive. Apply the caulk and “feather” it, even with the surrounding surface.

A more long-term fix is to use a product like Quikrete’s Polymer Modified Structural Repair to fill the cracked or crumbling edges of your driveway. This repair material can be sculpted and molded to reform the edge of your driveway, and it is designed to form a strong, durable bond with concrete. The best time to perform a structural repair is in the spring or summer when the weather is warm and dry.

Although some products can reduce random cracking in concrete, the only way to prevent cracks is to correctly design and construct your driveway. That means excavating to the proper depth, using the correct fill and compacting thoroughly, concreting at the appropriate depth with reinforcement, and incorporating expansion joints.

Mudjacking is a popular technique used to address some types of settlement in concrete. Still, it is messy and expensive and requires several days for the material to cure, leaving your driveway unusable during this time. It also doesn’t address the root cause of the settlement, so your driveway will likely sink or crack again over time. For these reasons, it is typically better to do a full replacement when necessary.

Concrete surfaces outside the home can become uneven, especially if a portion of a driveway or patio sinks. That can create tripping hazards that are particularly dangerous for elderly individuals and children who may not be paying attention. It is also unsightly and can make the entire property look unkempt. Luckily, there are several ways to deal with underwater sections in concrete.

One option is removing and replacing the concrete with a new pour. That can be expensive and time-consuming. However, it can produce a beautiful and long-lasting result. It is also important to address the cause of the hollow section to prevent it from recurring. A professional can help you determine what is causing the problem and offer solutions to keep it from happening again.

A common way to repair a sunken section is using a sand-concrete mixture. A hammer or chisel is used to chip away the old concrete and fill the holes with the sand mix. That is a quick fix that will raise the section back up. However, it will leave the surface looking patchy and different from the surrounding concrete.

Another option is to use a polyurethane injection method. That involves drilling holes into the existing concrete and pumping a liquid fill material into the gaps underneath. It can raise concrete and mudjacking, but it is considered a more long-term solution because the rigid expanding foam does not wash or shrink over time.

If you have an older concrete driveway, getting sunken sections repaired as soon as possible is important. That will help to prevent tripping hazards, car problems, and general damage to the surface. By contacting a professional concrete repair company, you can get the help you need to restore your driveway or patio to its former glory. They can advise you on the best repair method based on your unique situation and budget. They will also offer suggestions for keeping your concrete looking good and preventing future damage.

Concrete driveways tend to develop rough surfaces due to settling and the weight of cars on top. At the same time, many options for smoothing these uneven sections require specialized products and are best left to a professional contractor who knows how to use them properly.

Rough, pitted concrete can be repaired by filling the pitted areas with a cement patch mix that includes Portland cement, sand, and a polymer-based bonding agent. Before applying the patch, cleaning out the area to be filled and removing any loose debris is important. The patch should then dry before vehicles are driven over it.

Alternatively, you can pour a new layer of concrete to fill the hollow section. That can be done in a few different ways, including mechanically lifting the slab with some jack system and then refilling it; pumping material under the concrete to lift it and then filling the space underneath to keep the concrete from sinking again; or resurfacing the entire driveway with an overlay.

If you’re dealing with a large amount of uneven concrete, it might be time to replace your driveway. A concrete driveway professional can help you determine the issue’s underlying cause and whether repair or replacement is more appropriate.

Narrow cosmetic cracks less than a quarter inch wide don’t pose a structural threat and can often be repaired with a concrete resurfacing product. Wide, jagged cracks accompanied by heaving or settling indicate a more serious problem that must be addressed by replacing the entire driveway.

Whenever you’re working with concrete, wearing a face mask and nitrile gloves is important. Direct contact with concrete or its repair materials can lead to chemical burns and other serious injuries. Additionally, if you’re using a power tool, always ensure it’s turned off and isn’t running over the area where you’re doing repairs. That will prevent accidental damage to your vehicle or other property while attempting to repair your concrete driveway.

If a driveway needs repair, consider resurfacing the entire surface. Resurfacing involves putting on a new layer of concrete over the top of the existing concrete, and it is usually a better option than simply filling in cracks and patching holes. It can also improve the driveway’s appearance, and there are many different colors and patterns from which to choose.

Before you begin repairing and resurfacing your concrete driveway, it’s important to do a thorough inspection to determine the cause of any problems. That will help you decide whether the repairs are enough or necessary to replace the driveway. The biggest factor in determining this will be the amount of damage to the concrete. If the cracks are widespread and accompanied by spalling or heaving, it is likely time to replace the driveway.

It is also important to note that any crack in the concrete may allow water to get in and cause further damage. That is particularly true in climates where freeze, thaw, and refreeze cycles are common. When water seeps into the concrete and expands, it causes the crack to get bigger and may eventually break the concrete apart.

For small cracks and holes, using a concrete patching compound to fill in the problem areas is a good idea. The compound will seal the cracks and make it more difficult for water to penetrate them. For larger cracks, you can use a concrete patching kit with all the tools and materials needed for the job.

Once the repairs are done, you’ll need to wait a week before driving on the concrete and a month or so before parking anything larger than a small car. That will allow the new concrete to be set before the added pressure is applied. By getting ahead of these issues, you can save yourself from the headaches and expense of a full replacement in the future.

It’s important to understand that although a concrete driveway is a durable and strong material, it will still need regular maintenance. If left unattended, even minor cracks and holes worsen over time. By identifying the signs of needing concrete driveway repair and taking prompt action, you can keep your concrete surface looking good for a long time.