Fence Companies Charlotte Nc maintains privacy, keeps pets and children safe in the yard, and sometimes marks property boundaries. Fences can be constructed in a wide variety of styles and materials.
Before starting your fence installation project, check building codes and determine if you need a permit. You should also locate and mark buried utility services before beginning work.
If you opt for a wooden fence, you’ll need to install sturdy posts to anchor the whole structure. Wood posts can rot, so it’s good to foot them in concrete for added stability. Concrete is also more cost-effective than buying and installing wood posts.
Use a manual posthole digger or an auger to dig the holes for your fence posts. The holes should be deep enough to support the posts and allow for a proper amount of concrete to be placed in each hole. Local building codes may require a minimum depth of the fence posts, so check with your city before digging.
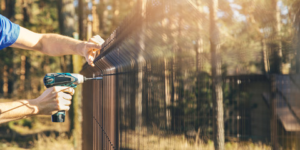
Once the holes are dug, use a stake to mark the position of each fence post. If you’re using t-posts, installation is much faster and easier since these steel posts don’t need brackets to hold them in place.
If you’re using standard wood fence posts, it’s important to use pressure-treated wood. This is because the treatment will help protect the wood from rotting and insects, which can shorten its lifespan.
Before pouring the concrete:
- Mix it in a wheelbarrow or bucket according to the directions on the package.
- Fill a temporary brace in the hole and set it at the appropriate height with a level.
- Place a fence panel between two posts and add blocking below it to raise the panel to your preferred height.
Once the concrete has been poured and set, use a sharp shovel to smooth it around the base of the post. It’s a good idea to slope the concrete away from the post at ground level to prevent rainwater from pooling near the post and potentially rotting it.
While it might be tempting to save time by skipping the concrete step, footing the fence posts in concrete is vital for ensuring that they remain level and flush with the ground over time. This will keep the fence from shifting and creating gaps over time, and it’s a far better option than leaving the posts in direct contact with soil, which can lead to rot.
A wood split rail fence is one of the most economical ways to keep your property fenced in and safe. The average wood fence costs about $11 to $20 per linear foot, including the cost of materials and installation. It also looks beautiful and adds to the charm of your home. A split rail fence is ideal for homeowners who want to keep their pets, livestock, and gardens confined on their land but don’t need the security of a solid barrier such as a privacy or chain-link fence.
The first step in installing a split rail fence is to dig holes for the fence posts. Start at one end of your yard and mark the placement of your fence posts with a line level or a tape measure. The bottom rail should be at least 6 inches above ground level to help keep it away from moisture, which can cause the fence boards to decay. Once the posts are in place, measure from the bottom of each post and mark the location for the remaining rails. Ensure the first rail’s top edge is flush with the top of each fence post.
Repeat this process for the remaining rails and then attach them to the posts with deck screws. When it comes time to install the cap rail, you should use a longer piece of lumber that runs flat across the top of the entire length of your fence. This will provide a nice finish that will protect your fence from the elements and prevent moisture damage.
Before putting on the cap rail, you should ensure all of your wood is painted or treated to extend the life of your new fence. It is recommended to use a water-resistant stain or oil-based paint that can be used on pressure-treated lumber. It is also a good idea to use rust-free screws or nails when installing the cap rail to avoid any corrosion that can occur over time.
Unless you have a specific reason to do otherwise, always mount your rails with the “good side” facing outward toward your or neighbors’ yards. This helps reduce the risk of criminals using the rails to climb your fence and see what’s inside. It also complies with many building codes that require installing rails with the good side facing outward.
Your backyard is your retreat, where you soak up the sun’s rays, plant vegetables for summer salads, and watch kids dig up worms from under rocks they never even noticed. But one thing that can mar your outdoor oasis is a shabby-looking fence. If yours is old, rusty, and faded, it’s time to give it a facelift.
The first step is to stake out your property line. This is done by driving wooden stakes and running a string between them to establish the boundaries of your property. Alternatively, you can follow the metal stakes that were driven into the ground when your property was originally laid out; if you do this, however, be sure to use a metal detector to locate any underground services.
Once the stakes have been set, dig holes at least three feet deep for each post. The holes should be wide enough to accommodate the posts’ concrete base. The soil type should also be considered; sandy soils require deeper holes than loamy ones.
After the posts are set, you can install the rails and pickets. It would be best to wait to start this part of the project until the concrete has cured completely.
For wood fence installation, the rails are 2×4 stringers that are screwed to the posts with metal fencing brackets. The stringers should be spaced a few inches apart and screwed to the posts at a height appropriate for your yard’s slope.
A general rule of thumb is to position a post every 8 feet along the perimeter of your yard. If you are installing a gate, consider adding more posts. For the rails, choose between wood, vinyl, and metal. Wood is the most common choice because of its warmth and classic beauty. It can be stained any color but will need periodic re-staining. Vinyl is another popular option because it resembles wood but doesn’t require staining. It’s rot-resistant and is available in most design styles. Metal fences are sturdy and rust-resistant but can be more expensive than other materials.
Post caps are not just a decorative finishing touch to your fence installation; they perform an important function. They prevent the end grain on top of posts from absorbing water, which can cause them to crack and rot. Posts exposed to moisture may also develop mold and mildew, reducing the lifespan of your entire fence. Post caps are an inexpensive and effective way to protect fence posts from rotting and other damage.
To install post caps, first clean the top of each post to remove any dirt or debris that may interfere with the adhesive or create a weak bond. Then, apply a generous bead of construction adhesive to the top of each post. After ensuring the bead is thick enough to ensure proper adhesion, allow the adhesive to dry per the manufacturer’s instructions.
Next, position the cap atop each post and press firmly to secure it. When installing post caps, it’s best to use exterior-grade adhesive to ensure a durable and long-lasting bond. Once the cap is firmly in place, allow it to cure for the recommended time.
Post caps are in various styles and sizes, from simple flat caps to elaborate finials. Whatever style you choose, measure the post’s diameter to ensure that the cap is the right size. Once the cap is properly installed, you can enjoy your new fence and rest easy knowing it is protected from moisture damage.
In addition to protecting your fence from moisture damage, post caps are an attractive and easy-to-install finishing touch that will enhance the beauty of your backyard and improve its overall appearance. You can further enhance the look of your fence by staining or painting your postcaps. This will protect them from harsh weather conditions and help them retain their color and beauty for years to come.
While it is often overlooked, the capping of fence posts is an essential part of a successful fence installation. Posts exposed to moisture can suffer from rot and other damage, but a simple postcap can significantly increase the life of your posts and keep your fence looking beautiful for years to come.